|
||||
|
I felt the need to restructure my old Sashimi thread.
This guide will help you setup your user customization as automated as possible. This guide uses Sashimi with several methods to backup your contacts such as google sync and/or outlook with active sync with a combination of reg keys and program files backup and restored using the UC stage (User Customization) found in most custom roms during setup to launch sashimi and push our user customizations. This is a collection of my work as well as many others from the PPCGeeks Community. Table of Contents Post 1 - Getting Started and Sashimi Info Post 2 - Contacts/Calender Backup methods Post 3 - Windows Mobile 6.5 & 6.5.x backup settings Post 4 - Manila 2.1 (Touchflo) & 2.5 (Sense) backup settings Post 5 - Titanium backup settings Post 6 - Device Specific backup settings Post 7 - Application Specific backup settings Post 8 - Application Specific continued. BIG THANKS TO: sstrunks (LuckySe7en) studentjunk D\/8 rootlinux rstoyguy Zone23 LordFuzzy024 dylan927us lilflip2 Askwhy Scoob rawdikrik fwt nhvoltagenh lovingHDTV digi gmaine02 christian.a liriel twe90kid glenwill CovKid66 Post 1 - Getting Started and Sashimi Info This section will guide you through setting up the foundation for auto customization. Basic Know How How to copy a file using Total Commander If your custom rom does not have Total Commander you can download the cab here http://www.ghisler.com/pocketpc.htm From Total Commander right select the file you want to copy, then go to the File Menu > Copy/Move > Tree > Select where you want to copy of the file to go to (Example: Storage Card > Sashimi > Auto > Root) > Copy [insert video] How to back up a registry key using Total Commander From the Root directory listed in Total Commander you should see a folder at the top labeled \\Plugins (if you dont press ".." button in the upper right cornor till you go back to Root) To access your phone's registry go to \\Plugins > registry > HKCR, HKCU or HKLM [insert video] Setup Sashimi This video (click the video below) walks you through the basics of Sashmi How to setup it up the first time. To download Sashmi please visit the home of Sashimi http://www.winmo-experts.com/ Sashimi Note: You don't have to re-install Sashimi after a flash, just run SASHIMI.exe from the \bin directory and SASHIMI will detect and perform a clean install and reconfigure itself.  Understand the Sashimi Auto Structure This video (click the video below) demonstrates how to use the Root folder of SASHIMI to copy files and folders using the Auto method of Sashimi.  Using UC Stage to push Sashimi Most custom ROM have a User Customization stage after the main setup of their Rom. We can use this stage to launch Sashimi. To do this: Step 1. Copy SDConfig.txt to the root directory of your Storage Card. Step 2. Copy MortScript-4.2-UCSASHIMI.cab to \Storage Card\SASHIMI\PROGRAM\UCINIT\ Step 3. Extract security.zip then copy security.xml to \Storage Card\SASHIMI\PROGRAM\UCINIT\. Then Copy the SASHIMI.INK to \Storage Card\SASHIMI\Program\Bin\ Done. BIG Thanks to studentjunk & D\/8 for this setup. AUTO INSTALL TO ALTERNATE STORAGE LOCATION (ASL) by studentjunk In addition to the \SC directory, SASHIMI also provides one additional Alternate Storage Location (ASL). To have CAB files install to an ASL in Auto mode, do the following:
PROBLEMS WITH SC and ASL INSTALLS The Auto Install to SC and ASL process depend upon SASHIMI being able to properly interpret the onscreen text in order to send automated screen taps. Storage Card and ASL installs will be disabled if either of the following is true:
NOTE 1: It is recommended not to touch the screen or use other applications while SASHIMI is installing and this is especially important during this phase. NOTE 2: Not all applications will work with automated installs (either to main memory or storage card). If a CAB file requires additional user interaction, it is generally better suited to install during the Manual Phase. In addition, some 3rd party applications which take control of the device's display may interfere with the Auto Install to Storage Card processes (e.g. screen shot or other capture software).
__________________
Last edited by murducky; 02-09-2010 at 11:54 AM. |
| This post has been thanked 21 times. |
|
||||
|
Re: [Guide] Murducky's Guide to Auto User Customization
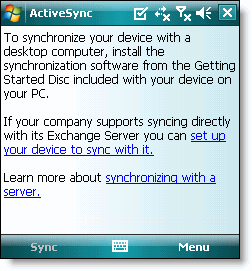
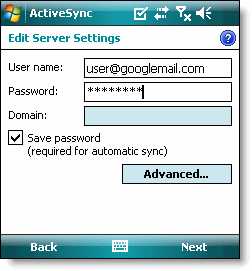
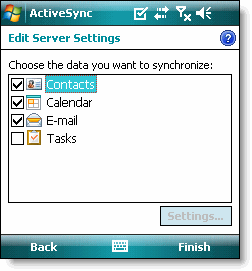
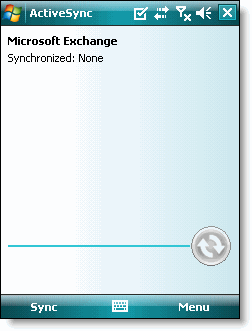
Post 2 - Contacts/Calender Backup methods This section will guide you through how to sync your contact & calender through various ways. Pim Backup Method If you do not use Outlook, Google, or Groupwise, the simplest way to back up both your contacts and calender events is to copy the pim.vol from the root directory of your phone to your storage card. After a flash, simply copy the backed up pim.vol from your sd card back to the root directory of the device (overwrite the current pim.vol). Important Note: this has to been done manually as you can not push the pim.vol using sashimi as sashimi does not copy back files back to the root directory of the phone. Google Sync Method Google Sync allows you to setup a Microsoft exchange sync to Google as if its an exchange server. You can push other contacts and calenders from other systems to your Google account and then have your phone sync to Google. First off you should have a gmail account. If you do not you can get one at http://mail.google.com. Setup the Google Sync Link to Google's instructions - http://www.google.com/support/mobile...36&topic=14299 Important Note: Make sure that you have backed up any Contacts and Calendars from your phone to your computer before proceeding. Just use the PIM method above. Important Note: There is a bug when you sync your contacts using Google Sync, they will be displayed lastname first, instead of first name first. Google is aware of this and should be fixing it soon. Till then there is an application Contact_changer_v1.3.cab that will fix it for you. The other down side is every time you sync it will change it back. This is how I use Google sync after a flash. [coming soon] [Insert Video SOON] Setup Google Sync on Device 1. Open the Active Sync application on your device's home screen. 2. Click Set up your device to sync with it. 3. Enter in your gmail email username@gmail.com 4. Enter m.google.com as the server address. 5. Ensure that the SSL option is selected. Sign In to Your Google Account 6. Click Next. 7. Enter your full Google Account email address as the User name. 8. Enter your Google Account password as the Password. 9. Leave the Domain field empty. If your device requires you to enter a domain name, enter google. 10. Click Next. 11. Check Contacts, Calendar, or Email, depending on which you'd like to sync. (Tasks is not supported and will lead to an error if checked.) 12. Click Finish. 13. Press the Sync softkey on the left to synchronize. Pictures Code:
Step 1 Windows Mobile/ActiveSync/Outlook Sync Method PCs running Windows Vista If your PC is running Windows Vista, your synchronization settings will be managed through the Windows Mobile Device Center. PCs running Windows XP or earlier If your PC is running Windows XP, or earlier, your synchronization settings will be managed through Microsoft ActiveSync.
Synchronize your data with WMDC Synchronizing lets you transfer e-mail, contacts, appointments, tasks, Web favorites, and media files from your computer to your device or from your device to your computer. You must accept an update to Windows Mobile Device Center (WMDC) on your computer before you can use WMDC to synchronize your device with your computer or with a Microsoft Exchange Server.  Step 1 Plug your device into your computer by using the USB cable or cradle. The Windows Mobile Device Center Home screen appears on your computer. Step 2 On your computer, click Set up your device. Step 3 Select the check box next to each information type you want to synchronize, and then click Next. Step 4 To synchronize with an Exchange Server, enter server information provided by a network administrator, and then click Next. Otherwise, click Skip. Step 5 Enter the Device name and then clear the check box if you do not want a shortcut for WMDC created on your desktop. Step 6 Click Set up. WMDC synchronizes the selected information types. Microsoft MyPhone Method Download and install the My Phone software On your desktop or laptop computer, go to http://myphone.microsoft.com and sign in to the service. You need a Windows Live ID to sign in. This sign-in information is the same user name and password you use if you use Windows Live Messenger. If you don't have a Windows Live ID, you can quickly set one up. After you sign in to the My Phone service, pick up your Windows phone and open Internet Explorer Mobile. Go to http://mobile.microsoft.com/myphone/en-us. When the web page loads on your phone, you'll see an option to download and install the My Phone software. Select the link, and download the software. When the software is downloaded (it should only take 60 seconds, at most), it automatically starts the installation. If you have a storage card in your smartphone, the software will ask where you want to install the software—to the device or to the card. Install it to the device. If you don't have a storage card, it won't ask this question; it will just install the app. After the installation is completed, an icon for Microsoft My Phone appears in your list of programs. Select it, and open the software. A handful of screens explain how the service works: One is a license agreement that you have to accept to use the service, and the final step is to enter your Windows Live ID information.  When you've completed these steps, you should see a message that says the software is signing in and configuring the service. Configure My Phone Next, you’ll configure the My Phone software on your phone. Fortunately, the one-step process is easy: You just choose automatic or manual synchronization. If you have an unlimited data plan on your smartphone, you should select Automatic. If you have a limited data plan but still want to use My Phone, select Manual, and run it when you want to. Select Next after you've chosen automatic or manual.If you have your smartphone connected to a Microsoft Exchange server, My Phone does not back up your contacts, calendar, and tasks because these items are already backed up in your Exchange account. You'll see a message like the one below, and My Phone will back up the other data items on your phone. If you don't have an Exchange server account, My Phone backs up your calendar, contacts, tasks, and everything else (text messages, photos, and other files).   At the end of the process, select Finish, and the synchronization starts. Depending on the amount of data that your phone has to synchronize, this process can take from minutes to hours. You may want to connect your smartphone to power during this process if it has a lot of data to be uploaded to the My Phone service and if the battery isn’t fully charged.  After the initial synchronization, you'll rarely have to open the software on your smartphone again. The exception is if you want to sync the contents of your storage card—to do that, look under Menu > Options. If you wish, you can also change when the scheduled automatic sync occurs (Menu > Schedule). By default, it will sync daily, but you can change it to run weekly or manually. Your final step is to go back to your desktop or laptop PC, browse to http://myphone.microsoft.com, and confirm that all of your data is there. Assuming that the synchronization is completed on the phone, it should be. And that's it, you're done!  Groupwise Sync Method [Coming Soon] Last edited by murducky; 02-05-2010 at 04:42 PM. |
| This post has been thanked 12 times. |
|
||||
|
Re: [Guide] Murducky's Guide to Auto User Customization
Post 3 - Windows Mobile 6.5 & 6.5.x backup settings Owner Info Key HKEY_CURRENT_USER\ControlPanel\Owner Or make a cab... Download SDConfig.Builder.v0.7.85.PE from http://forum.xda-developers.com/showthread.php?t=390846 Run SDConfig Builder.exe, go to the 5 tab (Owner Info), type in your Owner Info. Save to xml file. Then go to 4 tab (Cab & Copy). Browse for the xml you just made for Source XML, set an output directory. then click make cab. Now you have a owner cab you can push with Sashimi put owner cab in Storage Card\SASHIMI\Auto\Cabs\ Device Name HKLM\Ident Backlight HKCU/control panel/backlight HKEY_LOCAL_MACHINE\System\CurrentControlSet\Contro l\Power\Timeouts Alarm Settings HKLM\Software\Microsoft\Clock Splash Screen (EnergyROM Specific) \Windows\welcomehead.192.png Startup Sound (EnergyROM Specific) \Windows\PowerOn.wav copy \Windows\PowerOff.wav copy Voicemail Number (when you added your password to it)
Email Accounts & WIFI Settings You will create an XML file and save it to Storage Card\SASHIMI\Auto\XML using Sashimi/Makisu Built program. Watch the How To Here: http://www.youtube.com/watch?v=ANgzC...B817D8&index=0 Ring Tones Using the Auto\Root folder Sashimi create the same folder structure to copy over your ring tones.
so here is the run down about ringtones...before you back up these registries make sure you set them how you like first. Ring Tone Settings Easy Way Use a program called KeepMyTonesV1.6.cab Setup all your ringtones and contact ringtones. Use KeepMyTones to generate two xml files for you. Save Ringtonebackup.xml & NotificationBackup.xml to your XML folder in SASHIMI  Save Contact RingTone Screen:  Save Sounds & Notification Screen:  HARD WAY First set the Ring Tone then back up HKCU\ControlPanel\Sounds\Ringtone0 is where your ringtone registry is, for some reason there is two entries that reference my ringtone file, RingTone0 and RingTone2. I exported both in Storage Card\SASHIMI\Auto\REG *ALERTS AND NOTIFICATIONS* In HKCU\ControlPanel\Notifications\ there are a bunch of registries for all your alerts, they are all labeled in gibberish like this "{0CD9B91C-BEA7-446d-9857-BD2F1E6BFE80}" You have to use regedit and look at the first value, the first value should contain data that tells you what tone that registry entry is for. If the first value is blank don't back it up, there are more entries than there are alerts so you dont need to back up the blank ones. There is exactly 22 entries you need to export and back up to Sashimi. It was a PITA (Pain in the ***) to go through them and export them one by one, but you get done eventually. All Registry exports should go into Storage Card\SASHIMI\Auto\REG Sliding Sound First set the Sliding sound you want then back up the reg key \HKLM\Software\HTC\SlidingSound export to Storage Card\SASHIMI\Auto\REG All incoming beams off (Start>Settings>Connections>Beams) (thanks rstoyguy) Quote: HKLM\Software\Microsoft\OBEX obexservicemask = 3 ; checked obexservicemask = 2 ; unchecked Bluetooth Devices (thanks to Zone23) I found that if you backup registry key HKLM\Software\Microsoft\Bluetooth\Devices on restore it will restore all bluetooth devices. The only catch is I have not figured out how to get bluetooth headsets to work. All computer connections will work, so it’s a start. So at least so far I only have to repair my car and headset. All 3 computers work fine. Current power plan (thanks to Zone23) back up reg key HKLM\System\CurrentControlSet\Control\Power\Timeou ts export to Storage Card\SASHIMI\Auto\REG Turn on your Bluetooth (thanks to Zone23) Back up reg key HKCU\Software\Microsoft\Bluetooth\Settings"ScanMod e"=dword:00000005 Contact Ringtones Use a program called KeepMyTones download here: http://forum.xda-developers.com/showthread.php?t=540755 How to: (thanks to LordFuzzy024) There are three simple steps to save your contact ringtones. 1. Install the program 2. Set all your ringtones if you haven’t already. 3. Click File/Save Contact Ringtones. You’re done. There are also three simple steps for restoring your contact ringtones. 1. Install the program if it’s not already. 2. Make sure all your ringtones are located in the previous locations. (Usually My Documents\My Ringtones, or where ever you store them, it must be the same as before.) and your RingtoneBackup.xml file is located in your install directory. 3. Click File/Restore Contact Ringtones. You’re Done. The backup file is located in your install directory and it will notify you of that location upon saving. Last edited by murducky; 02-05-2010 at 05:22 PM. |
| This post has been thanked 10 times. |
|
||||
|
Re: [Guide] Murducky's Guide to Auto User Customization
Post 4 - Manila 2.1 (Touchflo) & 2.5 (Sense) backup settings SENSE 2.5 Settings Enable the animations on the home screen (lovingHDTV) [HKEY_CURRENT_USER\Software\HTC\Manila] "CachedBackgroundPath"="" "HomeBackgroundPath"="" Home Screen Quick Links (christian.a) HKLM\Software\HTC\Manila\Home Fav Contact Tab (liriel) Fav contacts are automatically restored with Manila 2.5 when you sync with Outlook (Created as a category "Favorite"). Another, option with more functionality is to use this program (Back FavPeople Tab): http://forum.xda-developers.com/showthread.php?t=543605 Tab order (twe90kid) (works the same as Manilla2.1) - HKLM/software/HTC/Manilla/Configuration Facebook and Twitter Login for Sense (glenwill) [HKEY_CURRENT_USER\Software\HTC\People\OwnerInfo] "FBBirthdayFromFB"=dword:00000000 "FBPhotoFromFB"=dword:00000001 "FBAutoUpdate"=dword:00000001 [HKEY_CURRENT_USER\Software\HTC\Manila] "Facebook.Account"="who@server.com" "Facebook.IsLogin"=dword:00000001 "PeopleBrowserSource"=dword:00000001 "PeopleAllViewSource"=dword:00000001 "Data.AutoDownloadOff"=dword:00000000 [HKEY_CURRENT_USER\Software\HTC\TwitterApp] "IsDownloadWhenRoaming"=dword:00000001 "IsCheckTweetAuto"=dword:00000001 "dwAutoCheckTweetsPeriod"=dword:0000003c [HKEY_LOCAL_MACHINE\SOFTWARE\HTC\HTCAccountManager] "FacebookUserName"="xxxxx" "FacebookAccount"="who@server.com" "FacebookSession"="xxxxx" "FacebookUserID"="1372835011" "FacebookSecret"="xxxxx" "TwitterTokenSecret"="xxxxx" "TwitterToken"="xxxxx" "TwitterUsername"="xxxxxx" "TwitterPassword"="XXXXXXXX" "TwitterAccount"="who@server.com" "FacebookToken"="" "FacebookSavePassword"=dword:00000001 HTC Stocks tab (CovKid66) You'll need to backup two files for this one... ygoservice.db and ygoservice_sr.db and both are stored in \Application Data\HTC\YGo Sense 2.1 Settings Tab order (twe90kid) (works the same as Manilla2.1) - HKLM/software/HTC/Manilla/Configuration HTC Stocks tab (CovKid66) You'll need to backup two files for this one... ygoservice.db and ygoservice_sr.db and both are stored in \Application Data\HTC\YGo Touch Flo/Manila 2.1 Manila/TouchFlo3d Fav Contacts Tab** If you are using TouchFlo3d and want to save your favorite contacts that information is stored in the pim.vol file located in your root directory, just back that up. pim.vol also contains all of your contacts! No need to use pim backup app unless you want to save all ur txt messages, recent calls list, etc. My Contact Card (thanks to dylan927us) backup reg key HKEY_CURRENT_USER\Software\HTC\People\OwnerInfo export to Storage Card\SASHIMI\Auto\REG Stock market Tab (thanks to lilflip2) Backup: "\\Application Data\HTC\ygo" I copied whole folder but (2 files ygoservice.db and ygoservice_sr.db) copy to Storage Card\SASHIMI\Auto\Root\ Application Data\HTC\ Save order of Tabs (thanks to Zone23 backup reg key HKEY_LOCAL_MACHINE\Software\HTC\Manila\Configurati on export to Storage Card\SASHIMI\Auto\REG Manila Weather (Thanks to Askwhy) To backup your weather settings you need to save a regfile to SASHIMI\Auto\REG with some of the data from -- [HKEY_CURRENT_USER\Software\HTC\Manila] In particular, you need to backup 'Weather.CityList' but I would also include: 'Weather.ServerURLOverride' 'Locale' 'Weather_Focus' 'Weather.Fahrenheit' 'Weather.PostFirstRun' After running SASHIMI you will have any pre-cooked-in locations removed and overwritten with your own -- and you will only need to hit 'Update'. For instance my file looks like this: [HKEY_CURRENT_USER\Software\HTC\Manila] "Weather.CityList"="NAM|US|CO|FORT COLLINS,NAM|US|DC|WASHINGTON,NAM|US|NY|NEW YORK" "Weather.ServerURLOverride"="http://weather.not2advanced.com/htcweather/forecastdata.php?ac=XDADevs&locCode=%25ls&version= 1&device=innovation" "Locale"="en-US" "Weather_Focus"="United States" "Weather.Fahrenheit"=dword:00000001 "Weather.PostFirstRun"=dword:00000001 Not sure if all the chefs have ROMs with the same weather server URL cooked-in, the one above is simply the one that was already in my registry when I went to back it up. I had no idea previously that a special weather patch server tied to the community was even being used to make things happen. If you have added a custom city using a database editor of some sort, you will also want to backup the manila file (database file) that you edited, and that file is called 2330fc3c_manila -- place that file in \SASHIMI\Auto\Root\Windows\ to have it restored automatically. Program Tab (thanks to Scoob) Back up reg key HKLM\Software\HTC\Manila\ProgramLauncher export to Storage Card\SASHIMI\Auto\REG Last edited by murducky; 02-06-2010 at 01:39 PM. |
| This post has been thanked 11 times. |
| This post has been thanked 8 times. |
|
||||
|
Re: [Guide] Murducky's Guide to Auto User Customization
Post 6 - Device Specific backup settings Touch Pro Camera Settings [HKEY_CURRENT_USER\Software\HTC\Camera] [HKEY_LOCAL_MACHINE\Software\HTC\Camera] Touch Pro II Camera Settings [HKEY_CURRENT_USER\Software\HTC\Camera] [HKEY_LOCAL_MACHINE\Software\HTC\Camera] Last edited by murducky; 02-05-2010 at 05:27 PM. |
| This post has been thanked 6 times. |
|
||||
|
Re: [Guide] Murducky's Guide to Auto User Customization
Post 7 - Application Specific backup settings BIG THANKS TO nhvoltagenh for the majority of this list. Arcsoft MMS Settings backup reg key \HKLM\Software\Arcsoft\ArcSoft MMS UA\Config\mm1 export to Storage Card\SASHIMI\Auto\REG Alpha Pocket Journal [HKEY_CURRENT_USER\Software\Alpha Realms] AVRCP [HKEY_LOCAL_MACHINE\Software\Wolf\Tools] cleanRAM [HKEY_CURRENT_USER\Software\HTCAddicts\cleanRAM] Facebook IM (fim) backup reg key HKCU\Software\mosko.mobi\fim export to Storage Card\SASHIMI\Auto\REG Garmin Complete Garmin folder from Root\Garmin GoogleMaps Program files\googlemaps folder G-Weather [HKEY_CURRENT_USER\Software\ageye\G-Weather] HTC Task Manager backup reg key HKEY_CURRENT_USER\Software\HTC\TaskManager export to Storage Card\SASHIMI\Auto\REG iContacts \Root\Program Files\iContact AE\ Themes (folder) cfg.dat settings.ini settings_qvga.ini settings_vga.ini IM+ [HKEY_LOCAL_MACHINE\Software\Apps\Shape Services IM+ Settings] \Root\Program Files\IMPlus\ resourcelib.dll SETTINGS.IM Setup.dll Lumos \Root\Program Files\Lumos\ SETTINGS.TXT Lumos (thanks to rawdikrik) Run the Lumos configuration program (just like you always would) then copy the "settings.txt" to "sashimi\auto\root\program files\lumus" you will need to create all these folders or figure out some way to copy them. Anything in the root folder copies to whatever folder on your device. Sashimi will create the folders if they don't exist, but typically it installs all the apps first. After an auto install I don't have to do anything with lumos (nice). You can do the same thing with ringers just make a mirror of what directory in "root" and Sashimi will copy them for you when you run it. Microsoft My Phone [HKEY_LOCAL_MACHINE\Software\Microsoft\My Phone\Publish\Services] MobilePad [HKEY_CURRENT_USER\Software\MobilePad] Nitrogen \Root\Program Files\Nitrogen\ SKINS (folder) CONFIG.DAT KEYS.DAT PLAYLIST.NPL PRESET.EQL SETUP.DLL Opera 9.5 Bookmarks are located \Windows\Opera9\Opera6.adr Opera 9.7 Bookmarks are located \Windows\Opera9\Profiles\Opera6.adr Opera 10 program files\Opera mobile 10\profile\datastorage PALRINGO Settings HKCU/Software/Parlingo/settings (backup and export the whole settings folder) phoneAlarm [HKEY_CURRENT_USER\Software\pocketMax\phoneAlarm] \Root\Program Files\phoneAlarm\ Each Theme Folder Desired Matching Theme.skn pa_Export.txt phoneAlarm.log phoneAlarm_User.cfg Resco Explorer HKLM\Software\Resco\Explorer HKLM\Software\Resco\Shell HKLM\Software\Resco\Registry S2U2 [HKEY_CURRENT_USER\Software\A_C\S2U2] SK tools [HKEY_CURRENT_USER\Software\SK\tools] Spb Wallet 2.0 [HKEY_CLASSES_ROOT\CLSID\{A79D1B0D-2F6A-4E7E-AF94-5EEBC8BFD684}] SPB Wireless (thanks to fwt) Settings: (registry) HKEY_LOCAL_MACHINE\Software\Spb Software House\Spb Wireless Monitor (and all Keys included) Registration: (registry) HKEY_CLASSES_ROOT\CLSID\{DD9B73F6-9EED-4ED0-84CF-422AF83512DB} Data: (files) "\Application Data\SPB Wireless Monitor S2U2 2.10 \Root\Program Files\S2U2 GFX (folder) lang.ini s2u2 Settings.log s2u2 Settings.reg s2u2c.log SmartPhone Tracker Setup all your settings, back up file, Program Files\SmartPhoneTracker/settings.config copy to Storage Card\SASHIMI\Auto\Root\Program Files\SmartPhoneTracker TouchResponse [HKEY_CURRENT_USER\Software\Snailslug\TouchResponse] TrackMe \Root\Program Files\TrackMe CONFIG.DAT LOCAL.SDF LOCAL.TMP SysWin.dll SysWinID.dll ThumbCal [HKEY_CURRENT_USER\Software\ThumbApps\ThumbCal] \Root\Program Files\ThumbCal SETTINGS.INI Twitter (PockeTwit) Backup file \Program Files\PockeTwit\app.CONFIG copy to Storage Card\SASHIMI\Auto\Root\Program Files\PockeTwit\ (You will have to create the path in your Auto\Root Folder) WhereIs \Root\Program Files\Where is Settings.dat Last edited by murducky; 02-05-2010 at 06:03 PM. |
| This post has been thanked 8 times. |
|
||||
|
Re: [Guide] Murducky's Guide to Auto User Customization
Post 8 - Application Specific continued. Coming Soon Last edited by murducky; 02-05-2010 at 04:56 PM. |
| This post has been thanked 3 times. |
|
||||
|
Re: [Guide] Murducky's Guide to Auto User Customization
Post 9: Reserved
Last edited by murducky; 02-05-2010 at 04:56 PM. |
| This post has been thanked 2 times. |
|
||||
|
Wirelessly posted (AdrianH85(TP2): Opera/9.5(Microsoft Windows; PPC; Opera Mobi/16643; U; en) HTC_Touch_Pro2)
can wait until this is done! so i can stop doing everything manually
__________________
Advanced posting,PPCG Wiki
Vzw sim unlock, sd rom flashing!!! feel free to DONATE its appreciated, but not required   |
 |
|
| Tags |
| customization, sashimi, user |
«
Previous Thread
|
Next Thread
»
|
|
All times are GMT -4. The time now is 03:05 PM.


 Step 4
 Step 7
 Step 11
 Step 13


 Linear Mode


